and a utility program for EM Adapters
- Compatible with NintendoSpy hardware
- Compatible with NintendoSpy skins
- Supports N64, GC, SNES, NES, Wii CC
- No flickering / blinking issues
- Controller detection and skin switching
- Up to 60 Hz refresh rate
- Automatic reconnect if the connection is lost
- Button counter support in skins
- Automatic firmware updates
- Adapter menu mirroring + navigation
- N64 MemPak backup and restore over USB
- View and change the menu button combo
- View device name and firmware version
- ← Controller input display
Input Display
for everyoneEMSpy displays live controller inputs using skin overlays. It works with any hardware compatible with NintendoSpy. EMSpy was written from scratch, primarily to eliminate the flickering and blinking issues which can happen with NintendoSpy, but has a few other benefits too.
EMSpy supports NES, SNES, Nintendo 64, GameCube, and Wii Classic Controller inputs. The controller type is detected automatically when connected, and the the pre-set skin for that controller type is loaded accordingly.
The Wii Classic Controller is supported through both the RetroSpy Wii Classic Controller style packet format, and the NintendoSpy GameCube packet format (which some NintendoSpy-compatible skins rely on).
classiccontroller and wii types. Please let me know if you find a skin which is not compatible, and I'll do my best to add support for it.EMSpy uses NintendoSpy-style XML-based skins, so existing NintendoSpy skins will work without any modification. A few optional extended skin features have also been added on top of the standard format, such as button counters and single-direction stick bindings.
On first launch, if you haven't already setup a skins directory, EMSpy will prompt you to either choose one, or download a pre-packaged example skins library. See the full list of example skins and download link below.
If you have multiple skins directories, these can all be added separately, and configured under Settings → Skin Search Dirs. This lets you keep your skin libraries organised, and wherever is
convenient.
Changes made to any skin whilst the application is running can be reloaded at any time with Skin → Reload Skins. Each skin's window size is remembered between sessions, and Skin → Reset Size restores the skin's native size.
EMSpy was written from the ground up, this means it doesn't have the same flickering and blinking issues that can sometimes be seen in NintendoSpy, due to software-side data loss / corruption.
Note: This only resolves software-side flickering and blinking. It can't fix hardware-side corruption, where a device with NintendoSpy (or similar) firmware sniffing the data line misreads the signal, for example by sampling it incorrectly. You should never see these issues when using an EM Adapter V2.
Up to a 60 Hz refresh rate (limited by the game's poll rate), with automatic reconnect if the device is unplugged or the connection drops.
Settings are saved automatically and restored the next time EMSpy launches.
You can specify custom deadzones for each controller type in Settings → Deadzones.
EMSpy can check for updates automatically on launch. This feature is enabled by default, but can be disabled in the advanced settings: Settings → Advanced Settings → App Update Check.
EMSpy is designed to work on both Windows and Linux systems.
EM Adapter
for EM Adapter ownersWhen connected to an EM Adapter running firmware V2.0.0 or later, EMSpy provides the following features in addition to the standard input display. The adapter must have Advanced → Input Display enabled in the on-device menu - see the EM adapter manual for setup details.
When you connect an EM Adapter running firmware V2.0.0 or later, EMSpy checks for firmware updates automatically. If an update is available, a notification appears and it can be downloaded and installed in under a minute with the click of a button. You can also trigger a check manually with Device → Update Firmware.
No separate flashing tool or manual file download is required, however, you also have the option to install directly from a firmware file directly if needed. If you want to disable the automatic update checks, this can be done in Settings → Advanced Settings.
When the adapter's on-device menu is open, EMSpy mirrors the OLED display live on screen. You can also open and close the menu and navigate it entirely from your PC - scroll or click to move through options, and right-click to go back - without ever having to look at the physical device display.
This makes it easy to access and modify adapter settings without needing to squint at a small screen. It also allows all devices to retain full functionality, even in the case of physical display issues.
View and change the controller button combination used to open the adapter's device menu. This is not an on-board menu option, to avoid the possibility of bricking the device by setting an impossible combination. Connect to the adapter and go to Device → Menu Combo in EMSpy.
EMSpy can read and write both the virtual MemPak stored in the adapter's internal memory (N64 adapter only) and
a physical N64 Memory Pak of any N64 controller connected to the adapter. Data is saved and loaded as standard
.mpk files, compatible with N64 emulators and other tools, with progress shown on screen during
each operation:
- MemPak → Read Virtual MemPak - dump the adapter's internal MemPak to a
.mpkfile - MemPak → Write Virtual MemPak - restore a
.mpkfile to the internal MemPak - MemPak → Read N64 MemPak - dump a physical N64 Memory Pak to a
.mpkfile - MemPak → Write N64 MemPak - write a
.mpkfile to a physical N64 Memory Pak
When connected, EMSpy displays the device name and firmware version reported by the adapter. As well as other details about the connected device, such as input types, and output type.
Getting Started
EMSpy is quick to set up. Grab it from the buttons at the top of the page – pick your platform below for the exact steps. On first launch you will be prompted to setup a skins directory, and EMSpy checks for its own updates on startup, or on demand via Help → Check for Updates.
Windows▸
Download the Windows installer and run it. There is nothing else to set up.
If you already have an older version installed, just run the new installer over the top of it – there is no need to uninstall first, and your settings and skins are kept.
Debian, Ubuntu and derivatives (.deb)▸
Download the .deb package and install it with your software centre, or from a terminal in the folder you downloaded it to:
sudo apt install ./emspy_2.1.1_amd64.deb
Using apt rather than dpkg -i means the few libraries EMSpy needs are pulled in automatically.
Arch Linux and derivatives▸
Arch is not Debian based, so the .deb will not install directly. Download the PKGBUILD instead, put it in an empty folder, and run this from that folder:
makepkg -si
That fetches the .deb from this site, repacks it into a pacman package, and installs it along with the libraries it needs.
The walkthrough below mirrors the built-in quick start guide, with a little extra detail for each step. Use the arrows or dots to move through it.
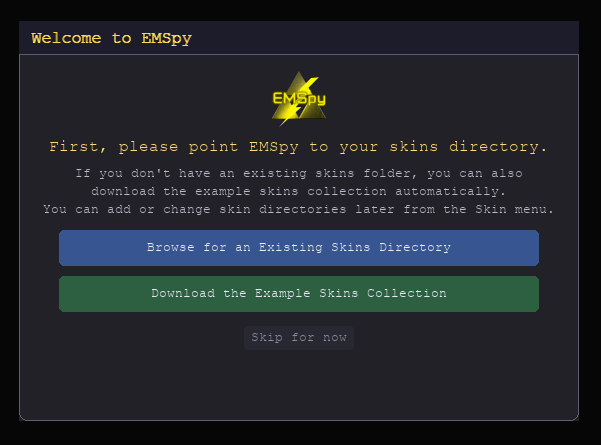
The first time you open EMSpy, it asks where to find your skins. Choose Browse ... to point it at a folder of skins you already have, or Download ... to fetch a collection of popular skins for NES, SNES, N64, GameCube and Wii Classic Controller.
- You can change or add skins folders later under Settings → Skin Search Dirs
- Browse the full list of example skins below
- You also have the option to skip - but you'll see no inputs until you set up a skins folder
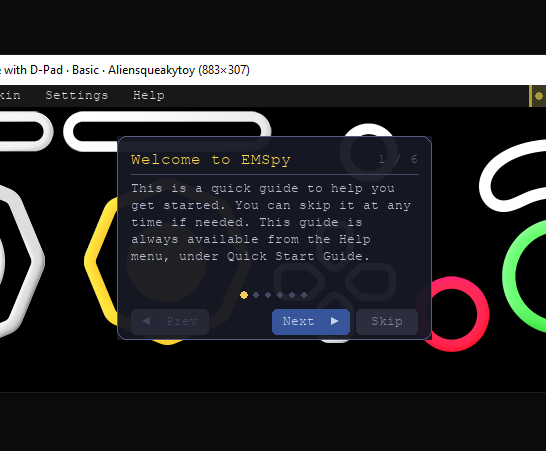
With your skins set up, EMSpy opens a short Welcome to EMSpy quick start guide that introduces the basics of connecting your device, and a few other features. It is completely optional - you may also skip it.
- Optional - skip if not needed
- At any point, you can revisit this guide under Help → Quick Start Guide
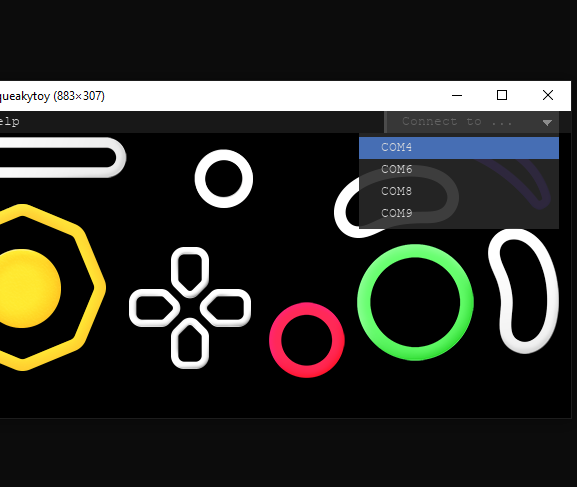
Plug your adapter or input display device into your PC with a USB data cable, then choose the matching COM port from the dropdown in the top-right of the window and connect.
- A green status means connected
- A yellow status indicates connecting...
- A grey status means no port is selected
- Ports on Windows are typically named COM1, COM2, etc. Ports on Linux are typically named /dev/ttyUSB0, /dev/ttyUSB1, etc.
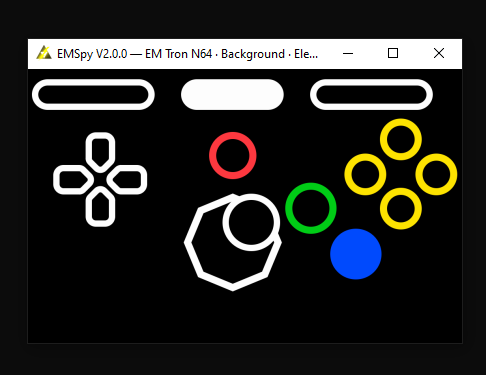
Once connected, your controller inputs are drawn in real time using the active skin. EMSpy detects the controller type automatically, so N64, GameCube, SNES, NES and Wii Classic Controller inputs all load the right skin without any manual switching.
- Renders at up to 60 Hz (if supported by your hardware, and the game running)
- Reconnects automatically if connection drops
- Hovering the cursor at the top shows the current skin, background and author
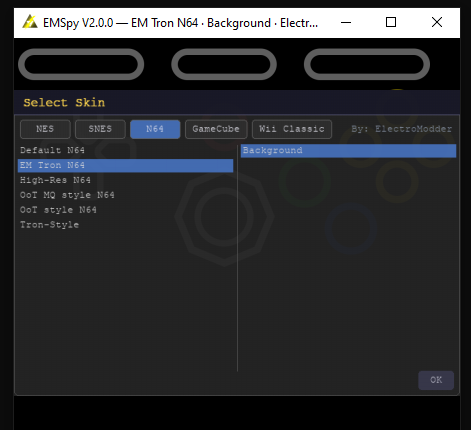
Open Skin → Select Skin to browse your installed skins. They are grouped by controller type across the tabs at the top, and many skins offer several background variations in the right-hand column. Pick a skin and background to set it as your active skin for that controller type.
- Compatible with NintendoSpy skins
- Add your own skin folders under Settings → Skin Search Dirs
- Skins with transparent pixels also have the option to select any background colour
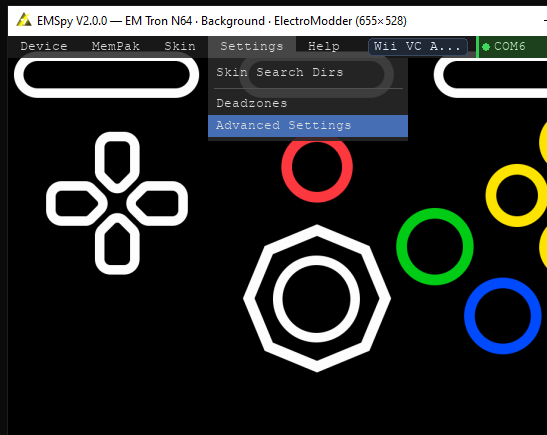
The menus at the top let you configure EMSpy's settings. Such as:
- Stick deadzones (visual only)
- Show, hide and reset button counters
- Show or hide the device menu mirror
- Reset skin window size to skin defaults
- Change the skins search directories
- Check for EMSpy updates
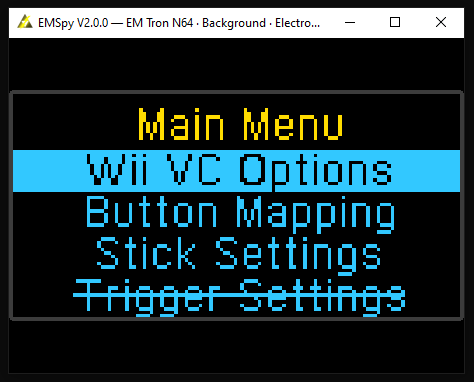
With an EM Adapter (V2), EMSpy mirrors the adapter's OLED menu live on screen. You can open and close the menu and navigate every option from your PC. Scroll or click to move through items, and right-click to go back.
- Keep full functionality even if the OLED is not accessible, or is hard to read
- This feature can be toggled on or off in Advanced Settings → Show Device Menu
- You can also use the keyboard to navigate
- The controller can still be used to navigate
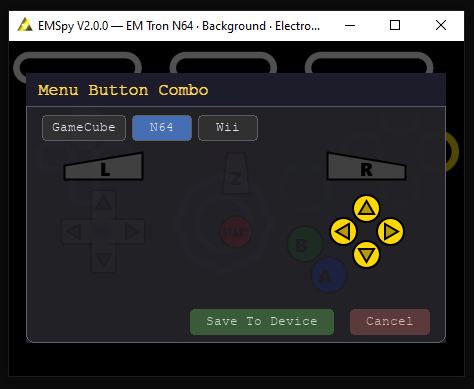
Choose the controller button combination that opens the adapter's device menu. Go to Device → Menu Combo, pick the controller type, click the buttons you want in the combo, and save it straight to the device.
- No risk of locking yourself out of the menu
- Saved directly to the adapter
- Your current combo is loaded by default
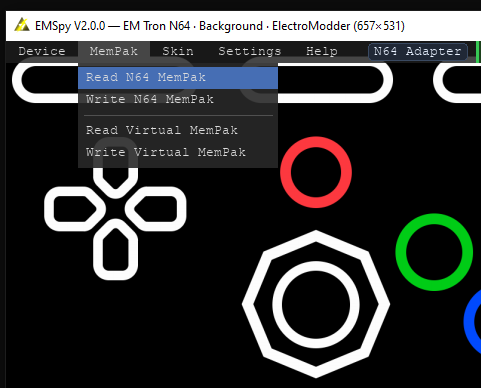
Back up and restore N64 controller PAK saves over USB. The MemPak menu can read and write both the adapter's built-in virtual MemPak and a physical N64 Memory Pak plugged into the adapter, using standard .mpk files that work with emulators.
- Read / Write Virtual MemPak - the adapter's internal memory-based virtual MemPak
- Read / Write N64 MemPak - a physical N64 MemPak plugged into the N64 controller
- Virtual MemPak only reads / writes whichever bank is selected in the device settings
- Writing will overwrite all saves on the PAK
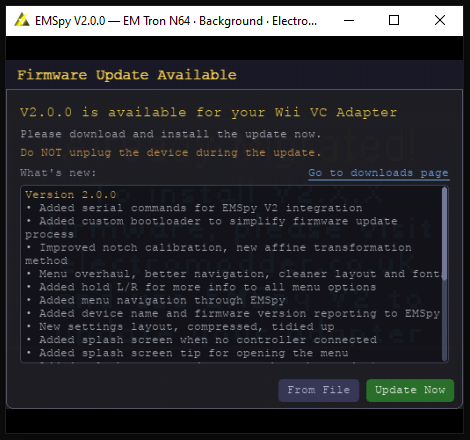
EMSpy checks for new adapter firmware on startup and can install it in one click. No separate flashing tool or download required.
- You can also check manually with Device → Update Firmware
- You can also manually download and install V2.x.x version updates from here
- Firmware updates can be downloaded and installed in under 20 seconds
- EMSpy will automatically check for updates upon device connection, but this can be disabled in Settings → Advanced Settings
- Do not disconnect or close EMSpy while an update is running
Example Skins
EMSpy can install a ready-made collection of example skins on first launch, or you can download it any time using the button below. Most of these skins were made by the wider NintendoSpy and RetroSpy community, not by me. They are popular, freely available skins, bundled here for convenience. Each is credited to its author below, grouped by controller type.
Nintendo 646▸
GameCube14▸
SNES2▸
NES2▸
Wii Classic Controller2▸
Extended Skin Features
EMSpy is fully compatible with the standard NintendoSpy skin format, and adds a small number of optional extensions on top of it. A skin that uses these extensions still loads in NintendoSpy - the extended behaviour is simply ignored there. Each addition is described below.
You can add button counters to any skin XML using the <counter> element. A counter keeps a running total of how many times a button has been pressed and draws it onto the skin. For example:
<?xml version="1.0" encoding="UTF-8"?>

<skin name="Basic Button Counter" author="ElectroModder" type="gamecube">

  <background name="Black 320x80" image="black_320x80.png" />

  <counter name="a"        prefix="A: "  font="Times New Roman" size="15" antialias="1" color="#ffffff" x="10"  y="10" />
  <counter name="b"        prefix="B: "  font="Times New Roman" size="15" antialias="1" color="#ffffff" x="70"  y="10" />
  <counter name="x"        prefix="X: "  font="Times New Roman" size="15" antialias="1" color="#ffffff" x="130" y="10" />
  <counter name="y"        prefix="Y: "  font="Times New Roman" size="15" antialias="1" color="#ffffff" x="190" y="10" />
  <counter name="z"        prefix="Z: "  font="Times New Roman" size="15" antialias="1" color="#ffffff" x="250" y="10" />
  <counter name="start"    prefix="S: "  font="Times New Roman" size="15" antialias="1" color="#ffffff" x="10"  y="30" />
  <counter name="l"        prefix="L: "  font="Times New Roman" size="15" antialias="1" color="#ffffff" x="70"  y="30" threshold="25%" />
  <counter name="r"        prefix="R: "  font="Times New Roman" size="15" antialias="1" color="#ffffff" x="130" y="30" threshold="25%" />
  <counter name="cstick_x+" prefix="Cx+" font="Times New Roman" size="15" antialias="1" color="#ffffff" x="10"  y="50" threshold="0.4" />
  <counter name="cstick_x-" prefix="Cx-" font="Times New Roman" size="15" antialias="1" color="#ffffff" x="70"  y="50" threshold="0.4" />
  <counter name="cstick_y+" prefix="Cy+" font="Times New Roman" size="15" antialias="1" color="#ffffff" x="130" y="50" threshold="0.4" />
  <counter name="cstick_y-" prefix="Cy-" font="Times New Roman" size="15" antialias="1" color="#ffffff" x="190" y="50" threshold="0.4" />

</skin>
Counter Attributes:
name: Button name, e.g.a,b,start, etc [1]threshold: Threshold for analog inputs [2]x: X-position of the countery: Y-position of the counterprefix: Text before the counter value [3]suffix: Text after the counter value [3]font: Font face to usesize: Font size to usecolor: Text color, accepts multiple formats, e.g.red,#FF0000antialias: Makes the text appear smoother (either on or off)
[1] The button name is required. It will map the counter to a controller input. For the GameCube C-stick, use cstick_x+, cstick_x-, cstick_y+, cstick_y- in conjunction with the threshold attribute.
[2] The threshold must be specified for the GC C-stick, and is optional for GC L/R triggers. This can be:
- Percentage of the maximum, e.g. 50%
- Fraction of the maximum, e.g. 0.5
- Exact integer value (out of 255 for triggers, 127 for C-stick direction), e.g. 64
[3] The prefix and suffix are optional. You can also use the <detail> element to add fixed images.
Unticking Show counters in EMSpy will hide all counters in the current skin.
To reset all counters to 0, right-click and choose Reset button counters.
The standard <analog> element draws an image whose fill follows an analog input. EMSpy extends this so a fill-bar can be driven by a single direction of a stick axis, rather than the whole axis. Suffix the stick axis name with a + or - sign to bind the positive or negative half of that axis:
<?xml version="1.0" encoding="UTF-8"?>

<skin name="Single-Direction Stick Example" author="ElectroModder" type="gamecube">

  <background name="Black 320x240" image="black_320x240.png" />

  <!-- Each half-axis drives its own fill-bar -->
  <analog name="lstick_y+" image="up.png"    x="140" y="60"  direction="up"    />
  <analog name="lstick_y-" image="down.png"  x="140" y="140" direction="down"  />
  <analog name="lstick_x-" image="left.png"  x="100" y="100" direction="left"  />
  <analog name="lstick_x+" image="right.png" x="180" y="100" direction="right" />

</skin>
The + suffix responds only while the axis is pushed in its positive direction, and - only while it is pushed in its negative direction. This lets a single stick drive up to four separate directional fill-bars. It is supported for every stick axis, across all controller types:
stick_x,stick_y: Nintendo 64 control sticklstick_x,lstick_y: GameCube control stickcstick_x,cstick_y: GameCube C-stickrstick_x,rstick_y: Wii Classic Controller right stick
Each axis accepts either a + or - suffix, giving two independent half-axis bindings per axis.
The fill amount is scaled to each controller's usable stick range: GameCube and Wii Classic Controller sticks use a 0 to 100 range, while the Nintendo 64 stick uses a 0 to 80 range. A fully deflected stick therefore fills the bar completely on every controller.