Jump to a section:
Universal Adapter Settings:
GameCube / Wii CC Settings:
Advanced Operation:
Universal Adapter Settings
Navigating the Menu
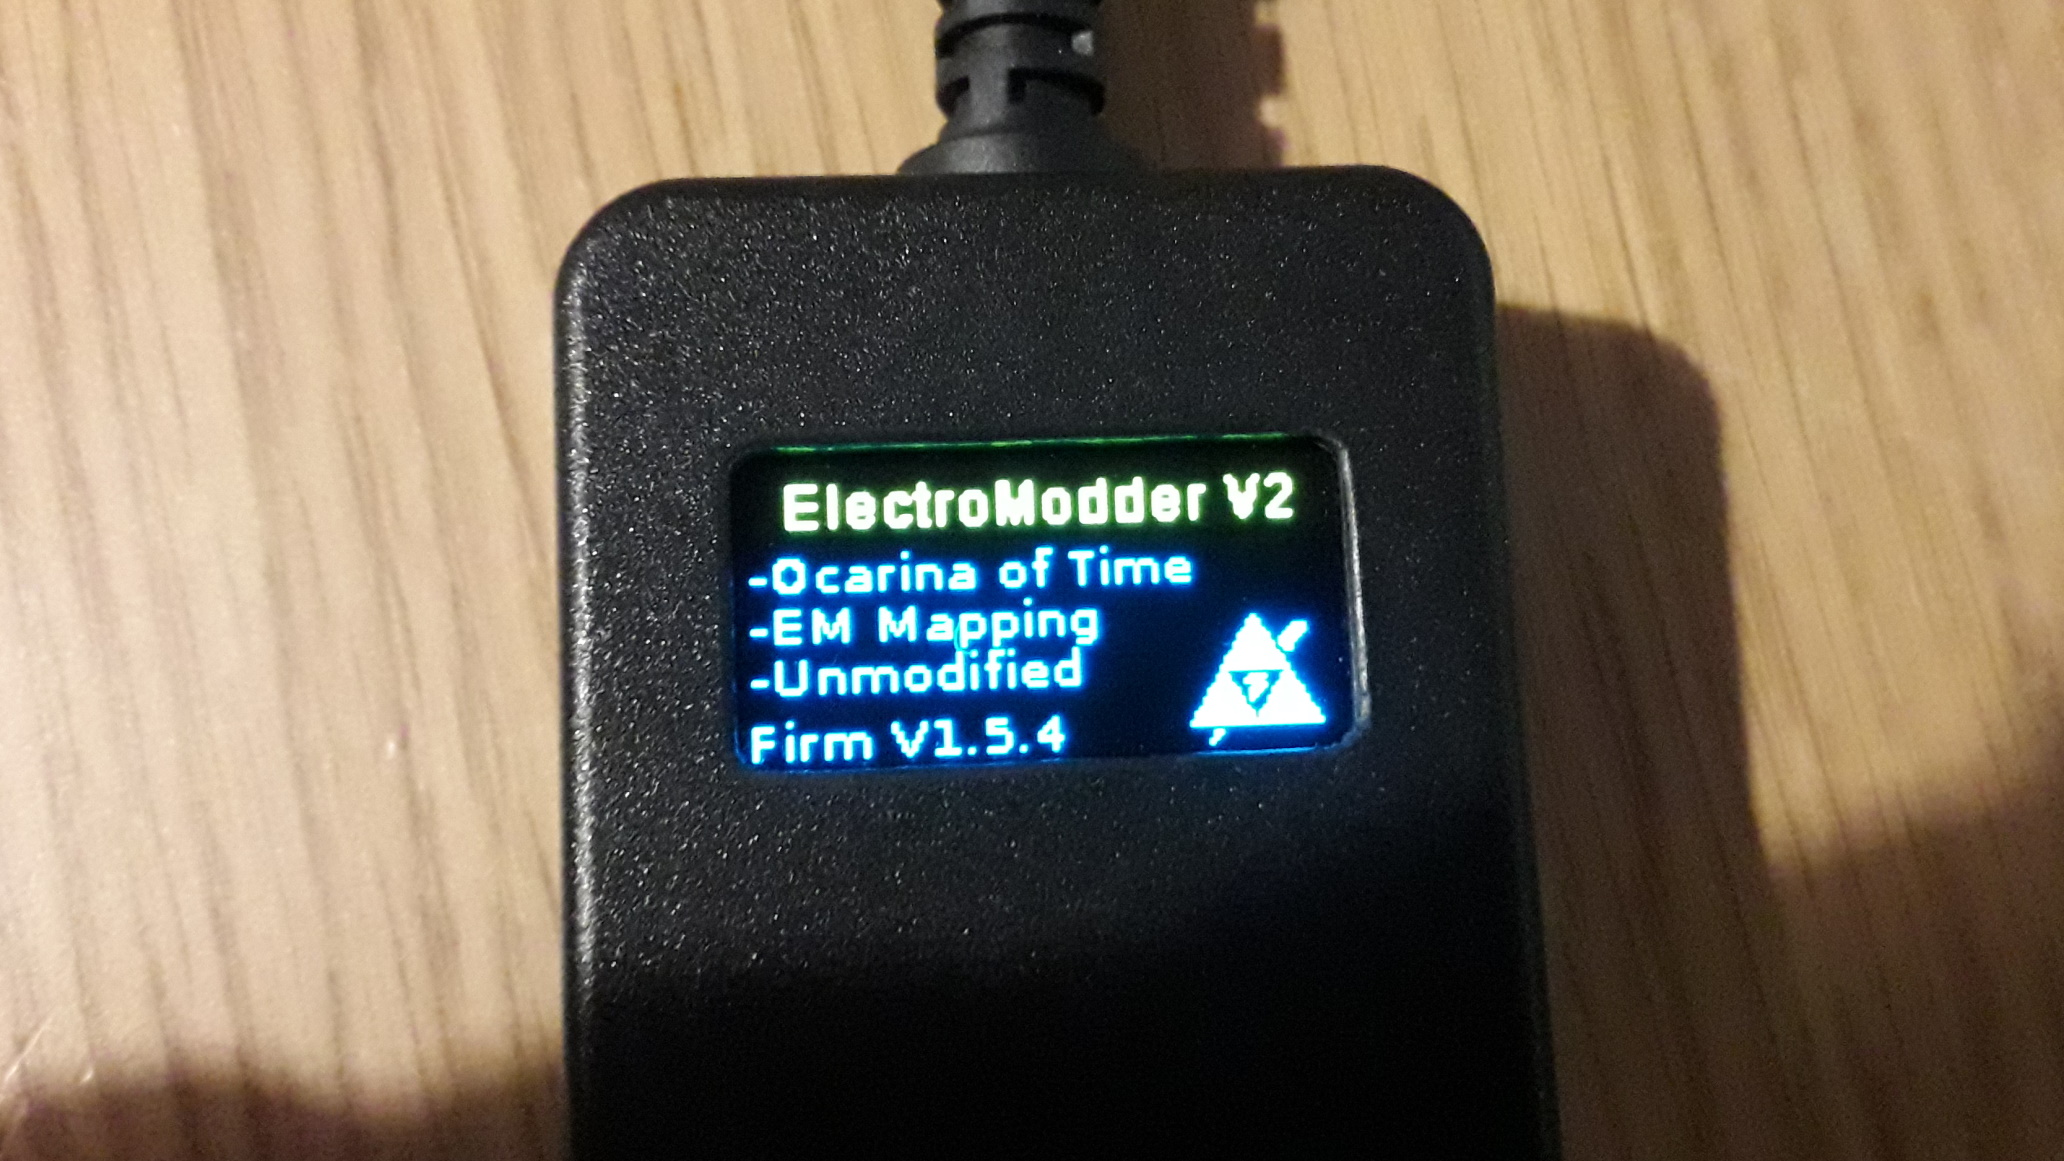
Every adapter has a small OLED display on the front. When the adapter is plugged into the console, and the console is powered on, the OLED display will show information about the selected game, stick mapping, and trigger settings. The firmware version will also be shown at the bottom of the display.
To configure any of the adapter settings, you must open the adapter menu. This is done by pressing the following buttons on the Nintendo 64 controller:

Or the following buttons on the GameCube controller:

Or the home button on the Wii Classic Controller.
When downloading firmware for your adapter, you can modify the menu button combination in the downloads page if this is required.
This will bring up the main menu, which will be shown on the OLED display. Whilst navigating through the menus, no inputs will be sent to the console.
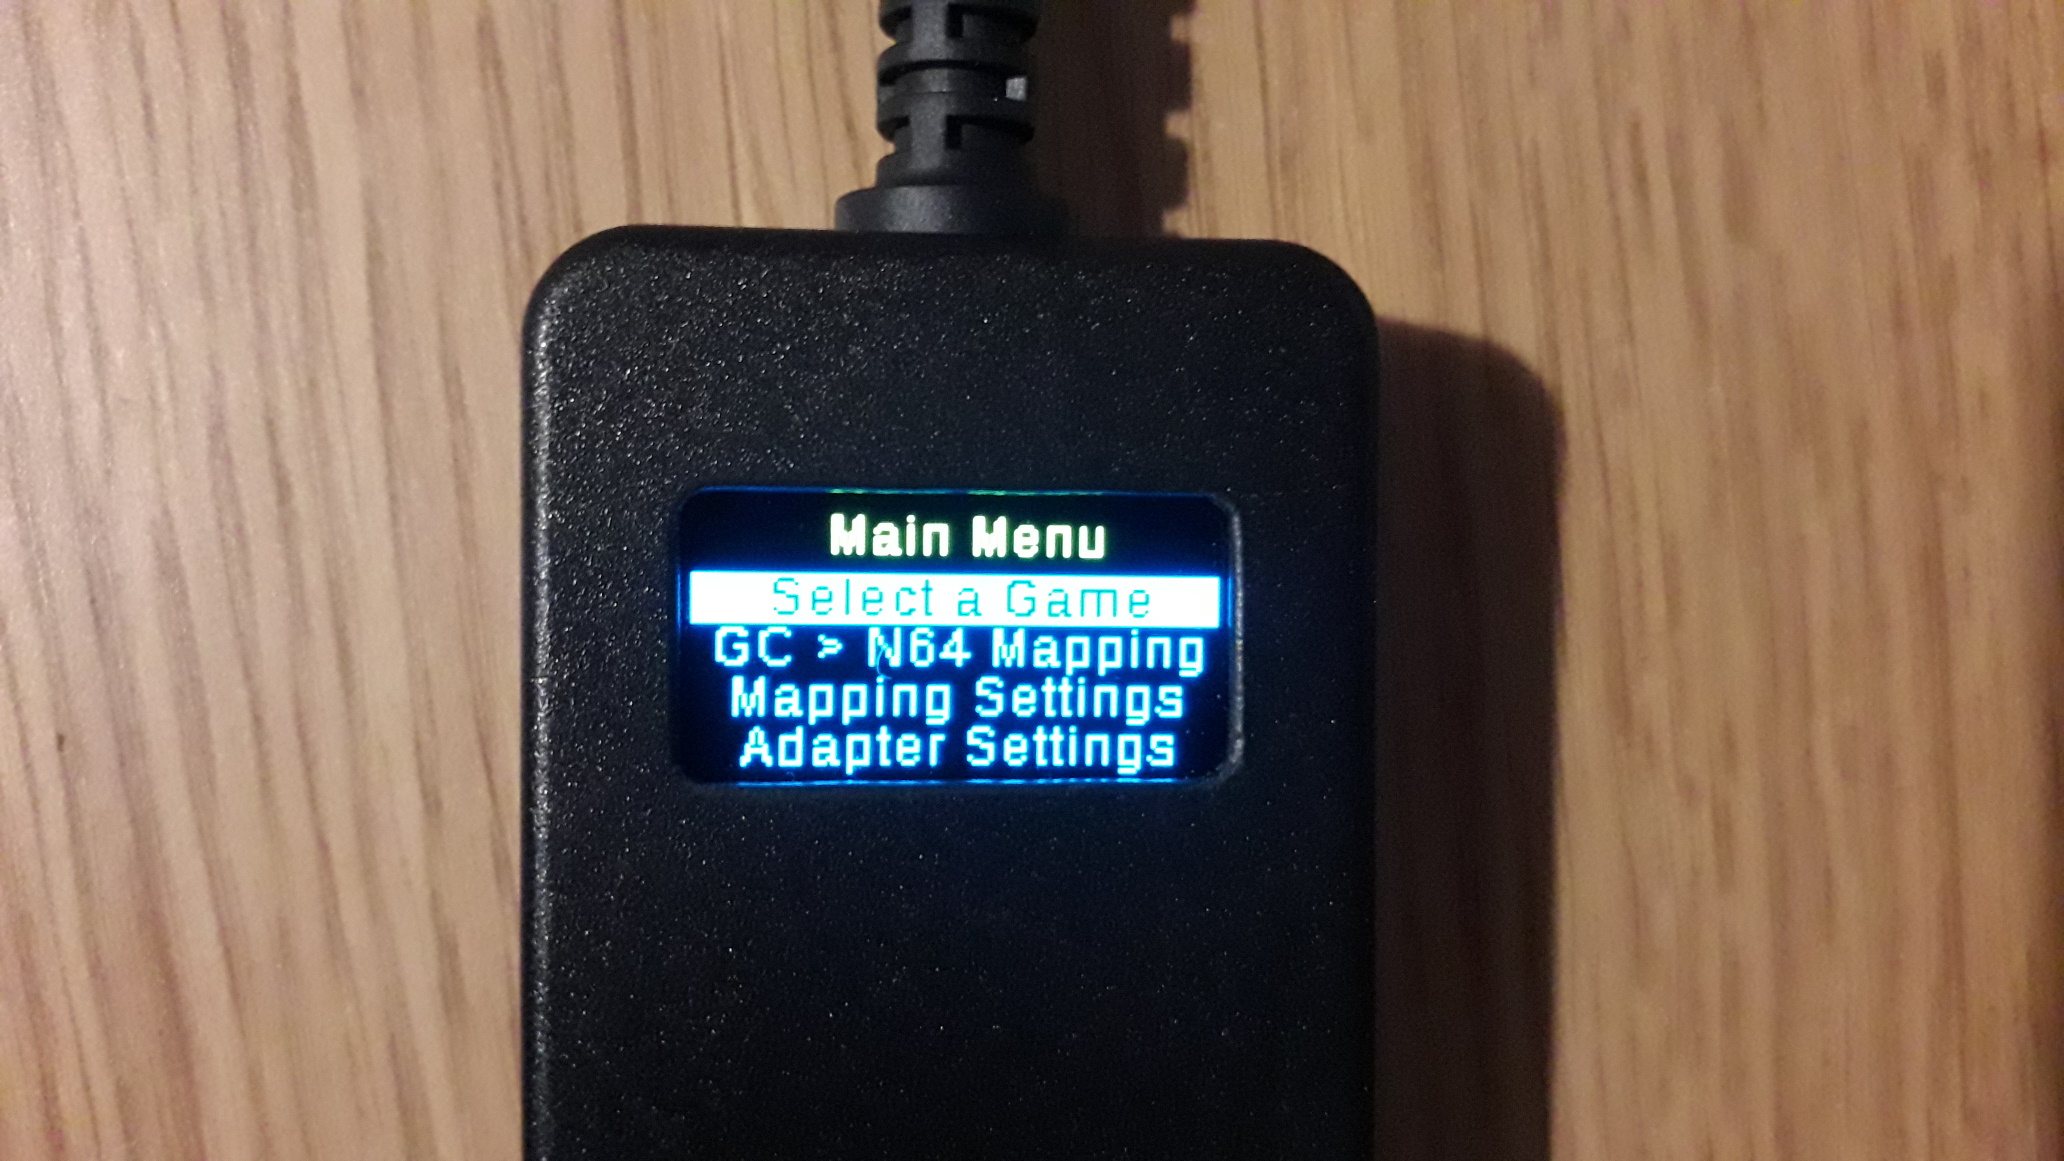
You can navigate through the menu using the control stick / d-pad, and the A and B buttons. The start button (or plus button for Wii CC) will exit the menu.
Your adapter settings will be saved automatically when you close the menu. The next time you power on the adapter, your chosen settings will be automatically restored.
USB Port / V2.0 / V2.1
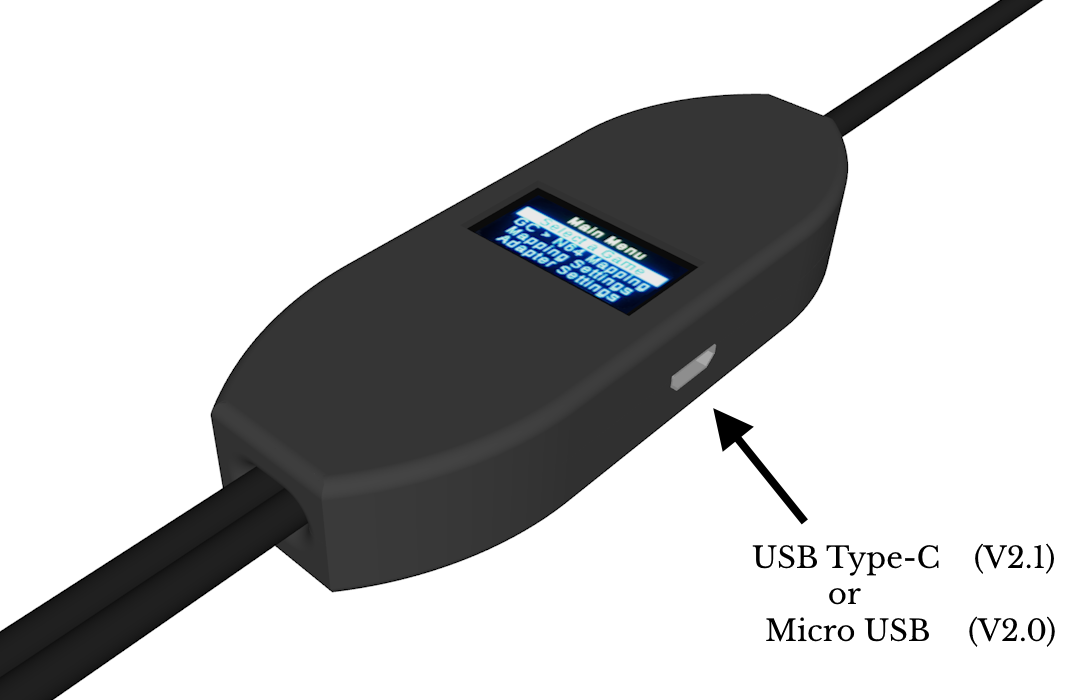
All V2 adapters have either a USB-C port, or a micro-USB port on the right-hand side:
- For V2.1 adapters, this is a USB Type C port
- For V2.0 adapters, this is a micro-USB port
If you intend to use the USB features, please make sure to buy the appropriate cable for your adapter. This cable should also be suitable for transferring data, and not be for "power only".
Note: The type of USB port is the only functional difference between V2.0 and V2.1 adapters. The internal microcontroller, firmware, and features, all remain the same between versions.
The USB port is current used for 3 features:
USB Menu Viewer
OLED displays can eventually fail after many hours of use. I try to reduce the speed of this by switching off the display when not in use, but I wanted a way to keep full adapter functionality, even without the display.
As of firmware V1.8.0, the display will be written to the USB port via serial at 115200 baud. This means, you can use a serial port viewer/terminal application, such as PuTTY, to still view the menu on your PC.
The latest version of my input-viewer software EMSpy also automatically displays the menu for you (when open), so you can also use this instead of PuTTY.
To get this working, connect your adapter to your computer with the appropriate USB data cable, and make sure any necessary drivers are installed (see Input Display Feature section for more information).
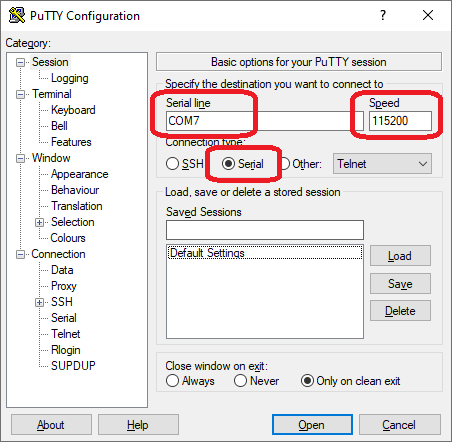
You will need software which lets you view information from a serial port in real-time, such as EMSpy or PuTTY. If using PuTTY, see below for details:
Note that you can't have 2 different programs reading the same port at once, so you'll need to temporarily close other applications reading from this port when you do this (e.g. NintendoSpy / RetroSpy).
Make sure you set the connection type to "serial", the "speed" to 115200 baud, and the "serial line" to the correct COM port for your adapter. This will be the same as for the input display feature. (In the below example, it is COM7 - but this will likely be different for you)
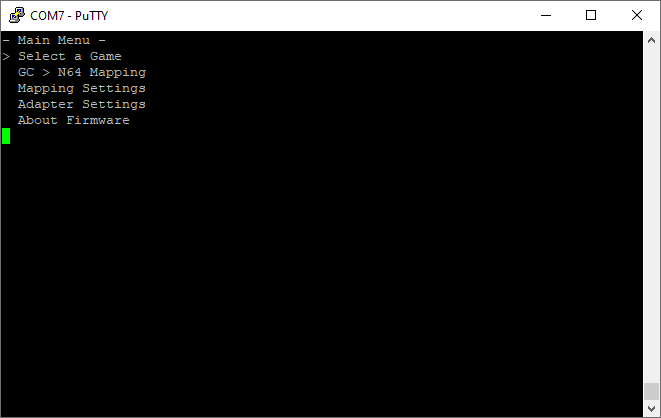
Next, click "Open" to open the connection. PuTTY should bring up another window, which displays the information coming from the adapter in real-time. This will be a bunch of 1's and whitespace characters if the adapter menu isn't open, this is the raw input display information. But if you open the adapter menu, it should display the menu instead, like below:
To go back to using the input display feature, you must first close the PuTTY window to close this connection.
Selecting a Game (VC Mapping + Buttons)
Whenever you start a game, you must ensure that you have selected the your game from the menu. If you play with the incorrect mapping chosen, the buttons and/or analogue stick will me incorrectly mapped, and will not function as intended.
In order to select your game, simply highlight it in the "Select a Game" menu. There are a total of 23 options to choose from in the menu. These can be seen below:
| Menu Option | Corresponding Game | Platform |
|---|---|---|
| 1080 Snowboarding | 1080 Snowboarding | Wii VC |
| Bomberman Hero | Bomberman Hero | Wii VC |
| Cruisin' USA | Cruisin' USA | Wii VC |
| F-Zero X | F-Zero X | Wii VC |
| Kirby 64 | Kirby 64: The Crystal Shards | Wii VC |
| Majora's Mask | The Legend of Zelda: Majora's Mask | Wii VC |
| Majora's Mask KZ | Majora's Mask KZ Practice ROM | Wii VC |
| Mario Golf | Mario Golf | Wii VC |
| Mario Kart 64 | Mario Kart 64 | Wii VC |
| Mario Party 2 | Mario Party 2 | Wii VC |
| Mario Tennis | Mario Tennis | Wii VC |
| Master Quest | The Legend of Zelda: Ocarina of Time & Master Quest The Legend of Zelda: Collector's Edition | GameCube |
| Ocarina of Time | The Legend of Zelda: Ocarina of Time | Wii VC |
| Ocarina of Time GZ | Ocarina of Time Trainer (GZ Practice ROM) | Wii VC |
| Ogre Battle 64 | Ogre Battle 64 | Wii VC |
| Paper Mario | Paper Mario | Wii VC |
| Pokemon Puzzle Lg | Pokemon Puzzle League | Wii VC |
| Pokemon Snap | Pokemon Snap | Wii VC |
| Sin & Punishment | Sin and Punishment | Wii VC |
| Star Fox 64 | Star Fox 64 | Wii VC |
| Super Mario 64 | Super Mario 64 | Wii VC |
| Super Smash Bros | Super Smash Bros. | Wii VC |
| Wave Race 64 | Wave Race 64 | Wii VC |
| Yoshi's Story | Yoshi's Story | Wii VC |
| SNES VC | A custom mapping for playing SNES VC titles | Wii VC |
Please note: There are multiple versions of the Legend of Zelda: Ocarina of Time, and Majora's Mask! These are the Wii Virtual Console versions, and the GameCube versions. These versions use different mappings, so make sure that you choose the correct option for the version you are playing!
Disable Stick Mapping
The analogue stick mapping feature can be enabled and disabled from the "Mapping Settings" menu. Pressing A on the "Mapping Enabled/Disabled" option will toggle it.
For the GameCube controller, disabling this will cause both the selected game, and the GC->N64 mapping options to have no effect. Instead, the controller stick values will get passed directly to the console.
For the Nintendo 64 controller input, a mapping is still required to recenter the values around (128,128) not (0,0). So disabling the VC mapping with this option causes a very basic stick mapping to be used which has NO VC stick correction.
Disabling the stick mapping with this option allows the adapter to be used as a generic controller adapter and/or input display device.
Input Display Feature
In order to use the input display feature, you must connect the adapter to your computer using the appropriate USB data cable.
This is designed to work with the "NintendoSpy" software. Make sure you select the correct COM port in the software, and you choose the correct one of "Nintendo 64" or "GameCube" under "Controller Source".
For the Wii Classic Controller input, you must also select "GameCube" under "Controller Source". You can then use a custom skin in the software like this one to reskin for the Wii CC / CCP.
The input display feature can also be disabled altogether by toggling the "Input Display" option under the "Adapter Settings" menu.
If you are having problems connecting the USB, here are some basictroubleshooting steps:
- Make sure you have the CH340 drivers installed (it should be recognised as "USB-Serial CH340")
- Disconnect the adapter from the console, and reconnect the USB when the adapter is powered off.
- Try a different USB port. Be sure to try both USB2.0 and USB3.0 ports if you have both.
- Try a different micro-USB cable.
If the USB is connected when the adapter is already powered on from the console, Windows can sometimes misdetect the device as a serial mouse due to data already being sent to the computer. This causes the cursor to jump around. This is an unfortunate quirk of an old Windows driver. Firstly, make sure you have the CH340 drivers installed (it should be recognised as "USB-Serial CH340", not "Microsoft Serial BallPoint" mouse). If the problem persists, further fixes can be found here.
GameCube / Wii Classic Controller Settings
GameCube / Wii CC to N64 Mapping
In order to pass the GameCube controller's stick values through the same inverse mapping function as the Nintendo 64 stick values, they must first be warped to fit within the full working range of a Nintendo 64 controller's analogue stick. There are 4 built-in GameCube to Nintendo 64 stick mappings built into the adapter. These are my own custom mapping, and a 3 mappings identical to the GC->N64 Raphnet adapter mappings.
You can find a more in-depth explanation of the "EM Mapping" and "Raphnet V2.0" mappings, including before and after plots of each of the two here. I recommend using the "EM Mapping", but, I've added the other mappings for people who are familiar with the GC->N64 Raphnet adapter. It will make playing on Wii VC feel just like playing on the Nintendo 64 with the GameCube to N64 Raphnet adapter.
In order to change the mapping, simply highlight the corresponding mapping in the "GC > N64 Mapping" menu.
Trigger Modes
There are four different trigger modes available:
- Unmodified
- Soft (25%)
- Hard (100%)
- Custom (0 - 100%)
"Unmodified" mode will leave the triggers unaltered. They will act the same as they do normally.
"Soft" mode will threshold the analogue trigger values for L and R at 25%. Anything higher than this will act as a full (digital) trigger press in-game. This is useful for example if you prefer the "soft" triggers, like in the GameCube rereleases of the Legend of Zelda OOT, MM and MQ, and want those style triggers when playing the Wii Virtual Console versions.
"Hard" mode will set the analogue trigger values for L and R to zero, unless the triggers are fully depressed (digitally), in which case they will be set to 100%. This is useful for example if you prefer the "hard" triggers, like in the Wii Virtual Console rereleases of the Legend of Zelda OOT and MM, and want those style triggers when playing the GameCube versions.
"Custom" mode will act just like soft triggers, but you can adjust the threshold.
Changing the trigger mode is done by highlighting the corresponding option under "Trigger Mode" in the "Mapping Settings" menu.
In order to adjust the custom threshold, select it in the menu, and hold left or right on either the analogue stick, or the d-pad. You should see the value change in between 0% and 100% in the menu.
ESS Mapping
This option lets you adjust the size of "ESS position" for all supported versions of The Legend of Zelda - Ocarina of Time and Majora's Mask.
This feature can be found under the [Mapping Settings]->[ESS Mapping], and lets you set:
- Deadzone - This is primarily for MM, as OoT has in-game deadzone before ESS starts
- ESS Start - Where ESS position begins
- ESS End - Where ESS position ends
If a Zelda game is selected, and the VC correction mapping is enabled, this feature can calculate how to warp the mapping such that ESS starts and ends where you've set it.
However, if the VC correction mapping is disabled, this feature can still be used, IE, you're playing on N64 via chaining with another GC to N64 adapter. But it needs to know what GC to N64 mapping is being used by the other adapter.
As of firmware V1.9.2, you can use the final option in the "ESS Mapping" menu to set which GC to N64 mapping is being used. This can be any of the Raphnet 1.5, 2.0, and Extended modes.
Advanced Operation
Update / Reflash Firmware
If a firmware update is released, you can reflash your adapter with the latest firmware using the software and firmware files available on the downloads page here.
Firstly, please make sure you have the CH340 drivers installed. Windows should recognise the adapter as "USB-Serial CH340".
Steps:
1) Download the flashing software and extract the files to a new directory
2) Download the firmware file you want to flash your adapter with
3) Open the software, and make a note of the available COM ports; it may be the case that none are yet available
4) Disconnect your adapter from the console if it is connected
5) Connect your adapter to your computer via the USB-C / micro-USB port
6) With your adapter connected, a new COM port should appear in the software for your adapter; select it
7) Select the firmware file you downloaded in the software
8) Now connect your adapter to the console, and make sure the console is switched on
9) On the adapter, open the menu and select "Update Firmware" from the "Adapter Settings" menu
10) Click the "Upload" button in the software and wait for the process to complete
The process should take about 20 seconds to complete. Once the firmware has been successfully flashed, the software should say so, and you can then unplug+replug the adapter from the console to restart it.
DO NOT DISCONNECT OR UNPLUG YOUR ADAPTER DURING THE REFLASHING PROCESS!
Doing so could brick your adapter, meaning it will no longer work at all until you reflash it successfully.
If you somehow brick your adapter, do not worry... you should be able to follow the backup steps below to flash the firmware. This will fix your adapter:
Backup Steps:
1) Download the flashing software and extract the files to a new directory
2) Download the firmware file you want to flash your adapter with
3) Open the software, and make a note of the available COM ports; it may be the case that none are yet available
4) Switch OFF your console, and connect your adapter to the console; it should be powered off
5) Connect your adapter to your computer via the USB-C / micro-USB port
6) With a thin object, hold down the button on the back of your adapter, whilst powering on the console
7) You can now release the button. If done correctly, the adapter should be in programming mode
Note: nothing will be displayed on the adapter even if done correctly
8) With your adapter connected, a new COM port should appear in the software for your adapter; select it
9) Select the firmware file you downloaded in the software
10) Click the "Upload" button in the software and wait for the process to complete
11) If the process fails to complete, try repeating from step 4 onwards
Note: The button must be held down at the same time the adapter is powered on in order for it to work
Reset Settings
You can quickly reset your adapter settings to the firmware defaults by selecting "Reset Settings" from the "Adapter Settings" menu.
Poll Rate
The poll-rate determines how frequently the adapter polls the controller. Rather than a frequency, it is specified as the interval between two consecutive polls. This value can be set anywhere between 1.5ms and 16.0ms.
This value can be viewed as an approximation for the maximum amount of input lag the adapter has, so theoretically it would seem to follow that the lower the value the better. However, while every controller I've tested seems to work at a poll rate of 1.5ms without problems, it might be the case that this is too frequent for other controllers which I haven't tested. For that reason, I've added the option so people can configure this as required.