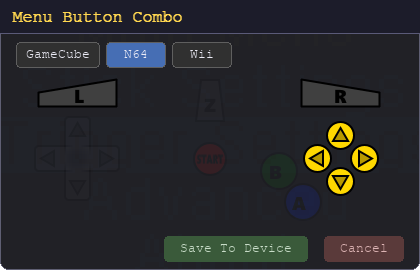
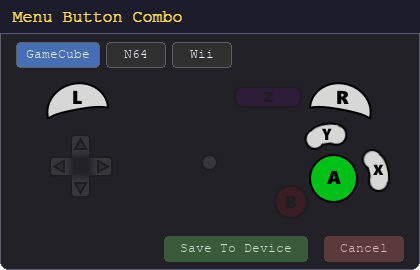
Every adapter has a small OLED display on the front. By default, when a controller is connected, the display will show the menu combo - a prompt showing which buttons to press to open the adapter menu:
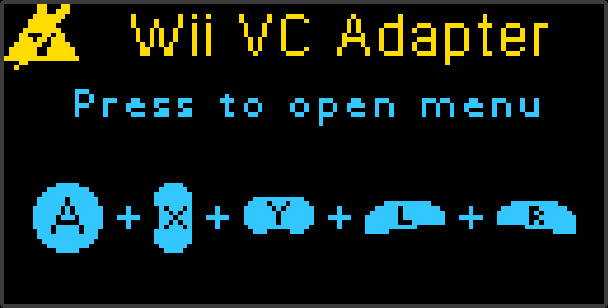
After about 10 seconds, the display dims to save power and reduce burn-in. This timeout is configurable - see OLED Timeout.
Once the menu has been opened and closed, the display switches to a regular splash screen showing the current state of some of the more important settings, with the firmware version in the bottom corner:
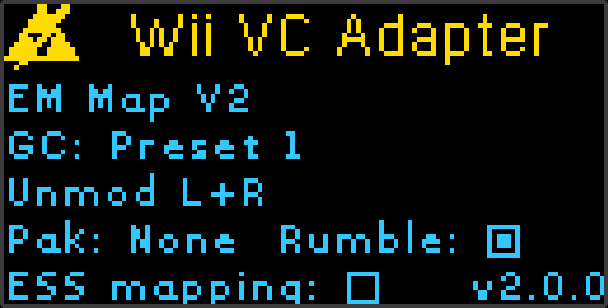
If you would rather always see this settings splash screen and never the menu-combo prompt, disable Advanced → Show Menu Combo.
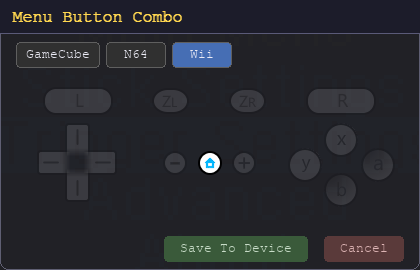
To open the adapter menu, press the following combination on your controller:
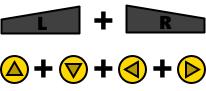
L + R + all 4 C-buttons
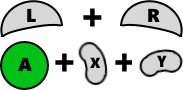
L + R + A + X + Y
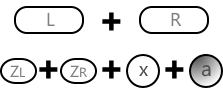
L + R + ZL + ZR + A + X
Once the menu is open, no inputs are sent to the console. Move between options using up and down on the control stick or d-pad. Press B to go back to the previous menu, and Start (or +/- on Wii Classic Controller) to close the menu from any screen. The menu can also be navigated from your PC using EMSpy, which mirrors it live on screen.
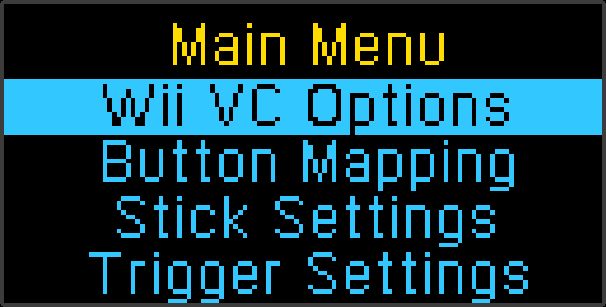
How you interact with the highlighted option depends on its type:
| Option type | How to use it |
|---|---|
| Sub-menu | Press A to enter. For example, Stick Settings and Trigger Settings open a further list of options. Press B to return to the previous menu. |
| On / Off toggle | Press A to switch the setting between On and Off. |
| Numeric value | Press left or right to decrease or increase the value (for example, Poll Rate or a threshold percentage). |
| Multiple choice | Press left or right to cycle through the available choices (for example, a button mapping preset or trigger mode). |
While any option is highlighted, press L or R to show more information about what that option does. This is a quick way to check the purpose of a setting without referring back to this manual.
Settings are saved automatically when you close the menu. Your settings will be restored the next time the adapter powers on.
The menu button combination can be customised for each controller type via EMSpy (Device → Menu Combo). The current combination can be shown on the OLED each time a controller is connected via Show Menu Combo.
All EM adapters have a USB port on the right-hand side of the enclosure:
- V2.1 adapters have a USB-C port
- V2.0 adapters have a micro-USB port
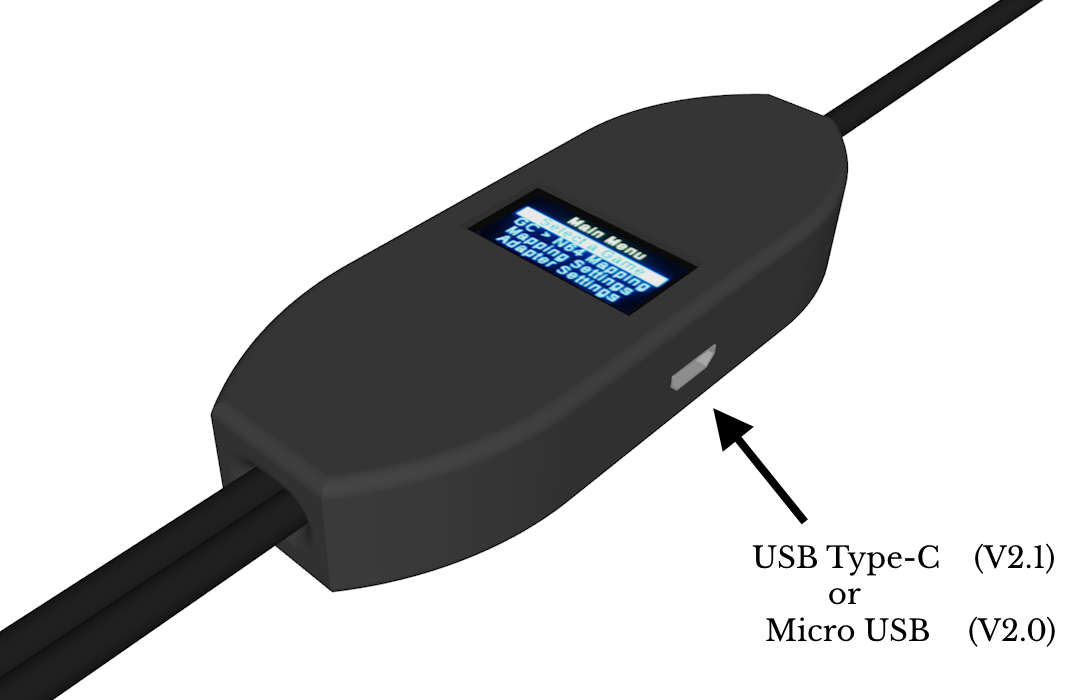
If you intend to use any USB features, use a cable suitable for data transfer (not charge-only). The type of USB port is the only functional difference between V2.0 and V2.1 - the microcontroller, firmware, and features are identical.
The USB port is used for the following features:
- Input display - stream live controller data to your PC
- Menu navigation - navigate the device menu from your PC
- MemPak management - back up and restore real or virtual N64 MemPak data
- Firmware updates - flash firmware updates onto your device
For all USB features, you will need the CH340 drivers installed. Windows should show the adapter as USB-Serial CH340 in Device Manager. These are very often pre-installed already, so you may not need to install them manually.
The Wii Virtual Console applies its own internal analog stick transformation when running N64 titles, which warps the stick range significantly and introduces a large deadzone. The VC correction mapping reverses this transformation so that stick inputs feel exactly as they would on real N64 hardware.
Enabling VC Features does the following:
- It applies the correct VC stick mapping, so your analog stick feels correct in-game
- It sets the Default button mappings to be correct for the selected game
- Any buttons already mapped correctly for the selected game get set to Default
These features can be toggled on or off via Wii VC Options → VC Features. The correct mapping is chosen based on your Game Selection. It is important to have the correct game selected, as different games have different stick and button mappings.
If you are using the adapter to play non N64 rerelease titles, such as regular GameCube or Wii games, you should disable this feature in order to avoid issues.
Disabling this feature does the following:
- All controller sticks bypass the VC correction mapping (other features still work)
- N64 sticks are mapped to fit the GameCube range, so they can still reach full range
- Default button mappings take their literal values (according to the selected game)
With the VC features enabled, you can still override specific button mappings using the Button Mapping feature. Putting them back to Default will restore the correct mapping for the selected game.
Each Wii Virtual Console N64 title uses a slightly different internal stick mapping. You must select the correct game from the Wii VC Options menu before playing. If the wrong game (or no game) is selected, buttons and/or the analogue stick will not be mapped correctly.
The game selected also determines the function of the default button mapping. You can still override individual buttons using the Button Mapping feature.
The following games are supported:
| Menu Option | Corresponding Title | Platform |
|---|---|---|
| 1080 Snowboarding | 1080 Snowboarding | Wii VC |
| Bomberman Hero | Bomberman Hero | Wii VC |
| Cruis'n USA | Cruis'n USA | Wii VC |
| F-Zero X | F-Zero X | Wii VC |
| Kirby 64 | Kirby 64: The Crystal Shards | Wii VC |
| Majora's Mask | The Legend of Zelda: Majora's Mask | Wii VC |
| Majora's Mask KZ * | Majora's Mask KZ Practice ROM | Wii VC |
| Mario Golf | Mario Golf | Wii VC |
| Mario Kart 64 | Mario Kart 64 | Wii VC |
| Mario Party 2 | Mario Party 2 | Wii VC |
| Mario Tennis | Mario Tennis | Wii VC |
| Master Quest | TLoZ: Ocarina of Time & Master Quest | GameCube |
| TLoZ: Collector's Edition | GameCube | |
| Ocarina of Time | TLoZ: Ocarina of Time | Wii VC |
| Ocarina of Time GZ * | Ocarina of Time GZ Practice ROM | Wii VC |
| Ogre Battle 64 | Ogre Battle 64 | Wii VC |
| Paper Mario | Paper Mario | Wii VC |
| Pokemon Puzzle Lg | Pokemon Puzzle League | Wii VC |
| Pokemon Snap | Pokemon Snap | Wii VC |
| Sin & Punishment | Sin and Punishment | Wii VC |
| Star Fox 64 | Star Fox 64 | Wii VC |
| Super Mario 64 | Super Mario 64 | Wii VC |
| Super Smash Bros | Super Smash Bros. | Wii VC |
| Wave Race 64 | Wave Race 64 | Wii VC |
| Yoshi's Story | Yoshi's Story | Wii VC |
| SNES VC | Custom mapping for SNES VC titles | Wii VC |
The N64 Adapter can emulate different controller pak types being connected, found under N64 Pak Settings in the main menu:
| Option | Description |
|---|---|
| Virtual Memory Pak | The adapter emulates a memory pak and stores save data on its internal EEPROM. No physical memory pak is required. |
| Virtual Rumble Pak | The adapter emulates a rumble pak, allowing games to trigger controller vibration if a physical rumble pak is connected. |
| No Pak | The adapter reports that no pak is inserted in the controller port. |
Virtual Memory Pak
The adapter emulates a standard N64 Controller Pak using its own internal EEPROM, so no physical pak is required. It provides two independent 256 Kilobit (32 KB) memory paks - Bank 0 and Bank 1 - each the same size as a real N64 Controller Pak and holding its own full, separate set of game saves. The active bank is chosen under N64 Pak Settings → Memory Pak Bank (default Bank 0), so you can, for example, keep different games' saves on different banks.
Either bank can be backed up to or restored from your PC with EMSpy:
- MemPak → Read Virtual MemPak - save the active bank to your PC as a file.
- MemPak → Write Virtual MemPak - restore a file back onto the active bank.
See the MemPak Management section for details.
Bringing across saves from a physical Controller Pak: A real Controller Pak inserted in the N64 controller is not read by games directly - in-game saving always uses the adapter's virtual memory pak, not the physical pak. To carry existing saves over, back the physical pak up in EMSpy with MemPak → Read N64 MemPak, then write that file onto a virtual bank with MemPak → Write Virtual MemPak. Those saves are then available in-game from the virtual memory pak.
Virtual Rumble Pak
The adapter emulates a Rumble Pak, so games that support rumble can trigger controller vibration. If a physical N64 Rumble Pak is inserted in the connected N64 controller, the rumble commands are passed through to it, driving the real motor.
The adapter supports fully customisable button mapping, allowing any input button to be remapped to a different output button, or disabled entirely. This is configured via the Button Mapping menu.
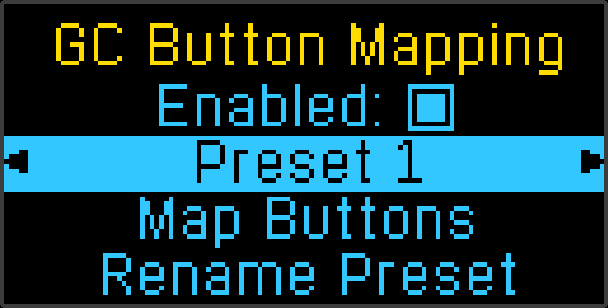
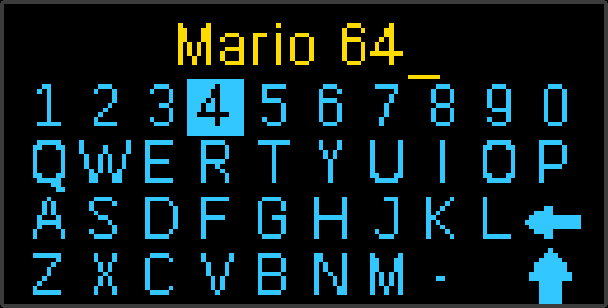
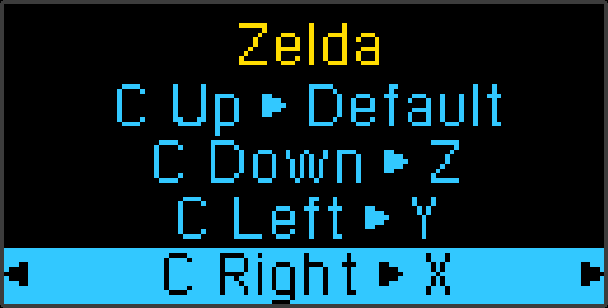
There are 4 independent presets for each controller input type (N64, GC, WCC). Presets are stored separately per input type, so switching from an N64 controller to a GC controller will use that input type's own set of presets. You can switch the active preset, edit button assignments, and rename presets from within the Button Mapping menu.
Preset names can be up to 12 characters. In the name editor, pressing the trigger buttons toggles between upper and lower case.
The default names are Preset 1, Preset 2, Preset 3, and Preset 4. But you can change them to better suit your preferences, For example: Zelda, Mario 64, Generic, etc.
Select Map Buttons to edit the current preset. Any button can be remapped to any output button, or set to None to disable it. Navigate to a button with the stick/d-pad, then use left/right to cycle through available output assignments.
The following table shows what can be remapped for each controller type:
| N64 (14) | GameCube (16) | Wii Classic Controller (19) |
|---|---|---|
| A | A | A |
| B | B | B |
| Z | X | X |
| L | Y | Y |
| R | Z | ZL |
| C-Up | L | ZR |
| C-Down | R | L |
| C-Left | Start | R |
| C-Right | D-Up | - |
| D-Up | D-Down | + |
| D-Down | D-Left | Home |
| D-Left | D-Right | D-Up |
| D-Right | C-Up | D-Down |
| Start | C-Down | D-Left |
| C-Left | D-Right | |
| C-Right | C-Up | |
| C-Down | ||
| C-Left | ||
| C-Right |
When using a GameCube or Wii Classic Controller to play a Nintendo 64 game, the analog stick values must be mapped to fit within the working range of the N64 analog stick.
There are 5 built-in mappings available, selectable from the Stick Settings menu:
| Mapping | Description |
|---|---|
| EM Mapping V2 | Custom mapping optimised for accuracy and feel. Recommended for most users. |
| EM Mapping V1 | An earlier version of the EM mapping. Reaches approximately ±76 stick units instead of ±80 - this was corrected in V2. |
| Raphnet V2.0 | Matches the GC-to-N64 Raphnet adapter V2.0 mapping. |
| Raphnet V1.5 | Matches the Raphnet adapter V1.5 mapping. |
| Raphnet Extended | Matches the Raphnet adapter Extended mode. |
The Raphnet mappings are provided for users already familiar with Raphnet's GC-to-N64 adapters who would prefer a similar stick feel. They are based on the 3 stick mappings from the gc_to_n64 project by Raphael Assenat (raphnet).
Notch calibration lets the adapter learn the actual positions of your controller's 8 cardinal and diagonal notches. Once calibrated, it continuously remaps the whole stick range so that your physical notches line up as closely as possible with the ideal notch positions. This corrects sticks whose notches are worn or slightly misaligned, and it does so smoothly - the stick values in between the notches are remapped too, not snapped or discarded.
It is configured from the Notch Calibration sub-menu within Stick Settings, which contains the following options:
- Enabled - Turns notch calibration on or off.
- Calibrate Notches - Opens the interactive calibration wizard (see below).
- Notch Snapping - Snaps stick values that land very close to a notch onto the exact notch position (see below).
- Target Offsets - Adjusts where each notch maps to. Best left at zero (see below).
Calibrate Notches launches an interactive wizard. It prompts you for each of the eight notches in turn - hold the stick firmly into the notch shown on screen, then press A to record it. Once all eight have been captured, the adapter saves them. If enabled, the adapter will then always use these calibrated notches to remap the stick values. Re-run the notch calibration wizard it any time you change controllers (of the same type), or if the stick wears over time. Each controller input type (N64, GC, WCC) has its own independent calibration, so you'll need to calibrate each one separately, but don't need to re-calibrate if you switch between controllers of different types (e.g. N64 to GC).
Notch Snapping forces any stick value that lands within a few units of a calibrated notch. Use left/right to adjust the threshold. The threshold is adjustable, up to 5 stick units (radially). It is off by default and is not generally recommended - standard calibration is precise enough for almost all use, and snapping throws away the fine stick movement around each notch. It is really only worth enabling if you need to hit one exact, repeatable angle every single time.
Target Offsets opens a similar wizard, but instead of recording where your notches physically sit, you can nudge where each notch is mapped to. With every offset left at zero (the default), the notches map to their ideal positions, which is what almost everyone will want. This is only useful when you want to consistently hit a deliberately off angle - for example a specific diagonal that is not quite the standard notch position. Adjusting these is not normally needed or recommended, so it's strongly recommended to leave them at zero unless you have a specific usecase for this.
The ESS adapter feature is a feature specific to the Legend of Zelda: Ocarina of Time and Majora's Mask, and should be disabled for other games.
The ESS adapter feature remaps the analog stick so that the ESS position (the position just outside the deadzone where Link shuffles in place) begins and ends at exactly the values you configure. This allows you to dial in precise ESS control regardless of your controller type or wear.
ESS settings are configured separately for each controller input type (GameCube, Wii Classic Controller, and N64), accessed via Stick Settings → ESS Adapter.
Selecting ESS Adapter opens an interactive wizard with three adjustable values:
- Deadzone (DZ) - The stick radius within which the output stays at zero.
- ESS Start - The stick radius at which ESS begins.
- ESS Range - The size of ESS position (end - start).
Inside the wizard:
- Press A to toggle the ESS adapter feature On or Off.
- Press up / down to select a value (Deadzone, Start, or Range), and left / right to adjust it.
- Press Start to reset all values back to their defaults.
The wizard also shows a live graph that previews how your stick will be remapped radially. The horizontal axis is the input radius (how far you push the stick) and the vertical axis is the output radius (what the game receives). When the feature is off, the graph is a straight diagonal line (output equals input), because stick values are passed through unmodified. When it is on, the line flattens within the deadzone and is reshaped so that the ESS zone falls exactly where you set the Start and Range.
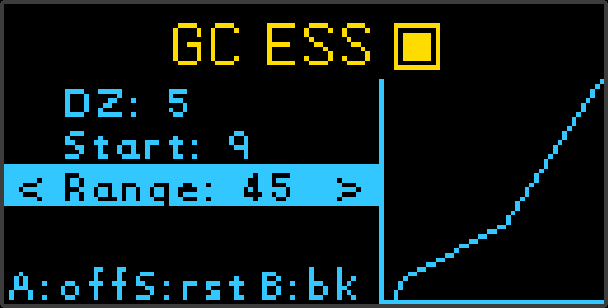
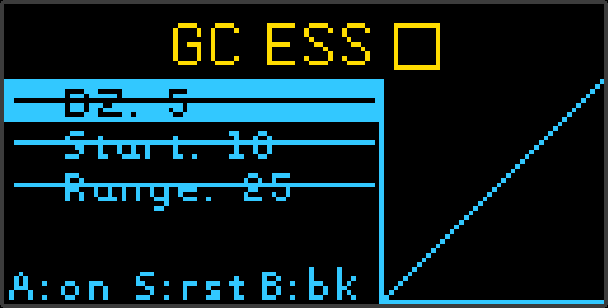
About the deadzone: In Ocarina of Time, the game already applies its own in-game deadzone (greater than 5 units), so raising the Deadzone value from 0 up to that point makes no practical difference (to my knowledge). Majora's Mask, however, handles the deadzone differently, which can make things like backwalking unreliable. The Deadzone setting can be used to force a deadzone (up to the ESS Start position), which may feel better than leaving at 0.
If you leave a gap between the Deadzone and ESS Start, the stick values in that gap are passed to the game as an intermediate range. In Ocarina of Time, there is no gap between the game's own deadzone and where ESS begins, so any gap you leave between Deadzone and Start simply maps into the in-game deadzone, making no functional difference. In Majora's Mask, however, there is a region between the in-game deadzone and the ESS start that is still meaningful (it is used for things like aiming), so this Deadzone-to-Start gap maps into that region also, and can behave noticeably differently. This is why selecting the correct game is important when using this feature.
The sensitivity setting is a general-purpose analog stick response curve, offered as a simpler, generic alternative to the ESS adapter feature. It works for GameCube, N64, and Wii Classic Controllers, and each controller type keeps its own independent saved value.
As the generic alternative to the ESS adapter feature, the sensitivity setting only takes effect when the ESS mapping is not being applied to the connected controller. That is the case when any of the following is true:
- The ESS adapter feature is turned off for that controller, or
- No Zelda game (Ocarina of Time or Majora's Mask) is selected, or
- GCWiimote The VC correction mapping is disabled and ESS → Via is set to Off.
The value ranges from 70% to 140% (adjusted with left / right in the Stick Settings menu), where 100% is a direct 1:1 mapping. Values above 100% make the middle of the stick range less sensitive (more precision at small deflections), which is the typical use case. This control affects the full stick range via a curve, not just the centre zone.
When stick calibration is enabled (the default), the adapter automatically reads the controller's resting stick position the moment a controller is connected, and uses that as the neutral (0,0) point. This corrects for slight drift or offset in the physical stick.
If you prefer to use a fixed neutral point rather than auto-calibration, you can disable this option from the Stick Settings menu.
These settings apply to the GameCube controller's C-stick, and the Wii Classic Controller's right-stick. They are found under Stick Settings → C Stick:
- Digitise - Converts the analog C-stick into four digital directions (up, down, left, right). Each axis snaps to one of three states: centered, or fully deflected in that direction, based on whether it exceeds the threshold below.
- Threshold - How far the stick must be pushed in a single direction to register as active when Digitise is on. Adjustable between 10% and 90%.
The Trigger Settings options only make sense for GameCube and Wii Classic Controller. N64 controllers only have digital triggers, so this menu is not available if a N64 controller is connected.
Changes how analog triggers are processed and mapped. Cycle through modes using left/right in the Trigger Settings menu.
| Mode | Description |
|---|---|
| Unmodified | Trigger analog values are passed through unchanged. The game receives whatever analog value the trigger is physically at. |
| Soft | The trigger outputs zero until the analog value reaches the configurable threshold, at which point it registers as a full press. |
| Hard | The trigger outputs zero until the trigger is fully depressed to its hard digital stop. Only a complete press registers. |
When Trigger Mode is set to Soft, this value determines how far the trigger must be pressed to count as a full press. Displayed as a percentage (0–100%).
Adjust using left/right while the threshold option is highlighted in the Trigger Settings menu. A lower value means the trigger registers earlier in its travel; a higher value requires a deeper press.
Rapid trigger is available when Trigger Mode is set to Soft. It allows the trigger to release without having to release all the way past the threshold. Instead, releasing the trigger by a small amount counts as a release, so it's ready to press again immediately. The goal of this is to reduce effective latency when releasing (and re-pressing).
Configure from the Trigger Settings → Rapid Trigger sub-menu:
- Enabled - Toggle rapid trigger on or off.
- Sensitivity - The minimum trigger movement required to count as a release and allow a re-press. Lower values mean the trigger will release and re-press with smaller movements, but may cause unintended releases if set too low.
- Hard Press - When enabled, releasing the trigger from the hard stop (digital press) always registers as a release, regardless of the soft threshold.
Controls which physical trigger(s) the trigger settings apply to. This includes the:
The available options are:
- Both L & R
- Only L
- Only R
- None
This setting is available when the trigger mode is set to Soft or Hard (not Unmodified). For example, you can set L to Hard mode only, while R remains Unmodified.
When Trigger Calibration is enabled, the adapter reads the resting position of the GameCube / Wii Classic Controller's analog triggers at the moment the controller is connected, and uses that as the zero point. This compensates for triggers that do not return fully to zero when released.
Toggle this on or off from the Trigger Settings menu. Keep it enabled unless you have a specific reason to use a fixed zero point.
EMSpy is a utility program for the EM Adapter V2. It communicates with the adapter over a single USB connection and provides a range of features:
- Input display - a live, real-time view of your controller inputs (see Input Display).
- Adapter menu mirror - when the adapter's OLED menu is open, EMSpy mirrors it live on your screen, so you can scroll and navigate it with mouse or keyboard without looking at the device.
- Firmware updates - handled automatically. Use Device → Update Firmware, or let EMSpy check on startup (a notification appears if an update is available; this check can be disabled in EMSpy's settings). See Update Firmware.
- Menu combo - change the button combination that opens the adapter menu via Device → Menu Combo, without using the OLED.
- Settings management - read and write adapter settings directly from your PC.
- MemPak operations - read and write both the virtual EEPROM MemPak and a physical N64 MemPak (see MemPak Management).
Enabling USB communication: Connect the adapter to your PC with a USB data cable (a charge-only cable will not work). Input Display (under Advanced → Input Display) must be On - it is on by default, so usually nothing needs changing. EMSpy can then connect via the correct COM port.
Driver: The adapter uses a CH340 USB-to-serial chip. If your PC does not recognise the device, install the CH340 driver from the Downloads page.
- Open Device Manager.
- Locate the CH340 device (often listed as USB-SERIAL CH340 under Ports (COM & LPT)).
- Right-click → Update driver → Browse my computer → Let me pick from a list.
- Deselect "Show compatible hardware" and select Standard Serial over Bluetooth link or manually assign the CH340 driver.
- Alternatively, disable the Serial Mouse service via
services.msc.
When Input Display is enabled, the adapter streams live controller data to your PC over USB, and EMSpy displays this as a real-time input viewer. It is found under Advanced → Input Display and is on by default, so in most cases no action is needed - just connect the adapter to your PC with a USB data cable.
EMSpy uses NintendoSpy style skins to display button presses, stick positions, and trigger values. Skins are loaded from a folder on your PC; EMSpy can automatically download example skins for you, for N64, GameCube, and Wii Classic controllers.
- You can also browse and download the full example skins collection.
- I also have a browser-based skin editor tool available here.
This setting controls the input display packet format used when a Wii Classic Controller is connected. Found under Advanced → WCC ID Fmt, use left or right to switch between RS (RetroSpy format, the default) and GC (GameCube format).
| Format | Details |
|---|---|
| RetroSpy (RS) default | Reports every Wii Classic Controller button correctly using the native RetroSpy format. Works with dedicated Wii Classic Controller skins. Compatible with EMSpy and RetroSpy, but not NintendoSpy. |
| GameCube (GC) | A legacy format that maps each Wii Classic Controller button onto a GameCube button. It therefore works with GameCube skins, but not with Wii Classic Controller skins. Compatible with EMSpy, RetroSpy, and NintendoSpy (using the GameCube controller type). |
Example Skins
Here is an example Wii Classic Controller skin, available for each format:
- WiiClassicController.zip - for RS (RetroSpy) format
- WiiClassicController-GC.zip - for GC (GameCube) format
Controls how frequently the adapter polls the connected controller for input. Found under Advanced → Poll Rate. The poll interval is adjustable from 1 ms to 8 ms in 0.05 ms increments.
The default setting of 1 ms is the fastest available and is recommended for virtually all use cases, providing the lowest possible input lag. A slower poll rate may be required for compatibility with certain third-party controllers or accessories that cannot respond reliably at 1 ms.
When more than one controller is connected to the adapter at the same time - for example an N64 and a GameCube controller both plugged in - Auto Switch will automatically switch between them based on which controller you last picked up. Found under Advanced → Auto Switch. This option only applies to adapters that accept more than one type of controller input.
Enabled (the default): the adapter watches the other connected controller and switches the active controller automatically as soon as you press any button on it. This lets you swap between two connected controllers just by pressing a button on the one you want to use, with nothing to unplug.
Disabled: the adapter only ever polls the controller that was connected first. Any other connected controllers are ignored until that active controller is disconnected, at which point another one can take over.
Sets how long the OLED display stays on after the last menu interaction. Found under Advanced → OLED Timeout. Adjustable from 3 seconds to 30 seconds. After the timeout elapses the display turns off, and opening or navigating the menu wakes it again. Setting a shorter timeout may reduce OLED degradation over time.
Rumble behaviour varies by adapter type and connected controller.
The Wii Classic Controller doesn't have any rumble capability, so this option does nothing for the Wii Classic Controller input.
Wii Virtual Console titles also do not send any rumble signals at all, even to the GameCube port. So this option does nothing in Wii VC titles.
However, N64 controller rumble works through the Rumble Pak, which is powered separately by batteries. Under N64 Pak Settings, if your Virtual Pak is set to Rumble Pak, the adapter presents a rumble pak to the N64 console. Then, any rumble commands sent by the console are forwarded to a connected physical N64 Rumble Pak (if one is inserted). See N64 Pak Settings for more.
Note that whilst your virtual pak is set to Rumble Pak, the game won't be able to save to the virtual MemPak, as the game will only see a Rumble Pak inserted.
EMSpy can read and write both the adapter's Virtual MemPak (stored in EEPROM) and a physical N64 MemPak inserted into a connected N64 controller. Use the MemPak menu in EMSpy.
Virtual MemPak (EEPROM)
The N64 adapter stores two independent 32 KB save banks in its internal EEPROM - Bank 0 and Bank 1. Only one bank is active at a time: the active bank is the one games save to, and the one EMSpy reads from and writes to.
- Switching bank is done on the adapter, under N64 Pak Settings → Memory Pak Bank (default Bank 0). EMSpy itself does not switch banks - it always targets whichever bank is currently selected there.
- MemPak → Read Virtual MemPak - Downloads the currently active bank from EEPROM and saves it as a
.mpkfile on your PC. Useful for backing up saves. - MemPak → Write Virtual MemPak - Uploads a
.mpkfile from your PC into the currently active EEPROM bank. Useful for restoring a backup or transferring saves from another device. ⚠ This erases and overwrites all existing data in that bank.
Physical N64 MemPak
With an N64 controller plugged into the adapter and a physical MemPak inserted into the controller, EMSpy can read or write the pak directly:
- MemPak → Read N64 MemPak - Reads the entire 32 KB pak and saves it to your PC as a
.mpkfile. Good for backing up your old save data. - MemPak → Write N64 MemPak - Writes a
.mpkfile from your PC to the physical pak. ⚠ This overwrites all existing saves on the pak.
The EMSpy Cmds option, found under Advanced → EMSpy Cmds, enables bi-directional communication between the adapter and EMSpy over the same USB serial connection used for Input Display. It is enabled by default, and is what powers the adapter's advanced USB features, such as the live menu mirror and navigation and MemPak operations.
The adapter only responds to these commands while Input Display is active. With EMSpy Cmds disabled, EMSpy won't negotiate with the adapter, and the adapter falls back to a basic text-only menu stream and those graphical features are unavailable.
Resets all adapter settings to factory defaults. Found under Advanced → Reset Settings.
After selecting Reset Settings, the adapter will ask for confirmation. Press the confirm button (as indicated on screen) to proceed.
V2.x.x Firmware
Firmware is updated through EMSpy over USB - no separate flashing tools are required. New firmware versions are listed on the Downloads page, and EMSpy can download and install them for you.
As long as your PC is connected to the internet, EMSpy automatically checks for newer firmware on startup. If an update is available, a notification appears so you can install it in one click. You can also check at any time from Device → Update Firmware.
- Connect the adapter to your PC with a USB data cable. Enable Advanced → Input Display on the adapter if it is not already on.
- Open EMSpy and connect to the adapter's COM port.
- If an update is available, EMSpy notifies you on a successful connection. Click the notification to install it. Alternatively, use Device → Update Firmware to check manually. The automatic startup check can be disabled in EMSpy's settings if preferred.
- EMSpy downloads the correct firmware for your adapter type and flashes it. The adapter restarts automatically when complete.
V1.x.x Firmware GC
Adapters still running V1.x.x firmware predate the V2 bootloader, so they cannot be updated through EMSpy. They are flashed with the standalone EM Firmware Flasher instead. The tool and the V1.x.x firmware files are on the Legacy Downloads page.
Before you start, make sure you have the CH340 driver installed. Windows should recognise the adapter as USB-Serial CH340.
- Download the flashing software and extract the files to a new directory.
- Download the firmware file you want to flash your adapter with.
- Open the software, and make a note of the available COM ports; it may be the case that none are yet available.
- Disconnect your adapter from the console if it is connected.
- Connect your adapter to your computer via the USB-C / micro-USB port.
- With your adapter connected, a new COM port should appear in the software for your adapter; select it.
- Select the firmware file you downloaded in the software.
- Now connect your adapter to the console, and make sure the console is switched on.
- Put the adapter into firmware update mode: on the adapter, open the menu and select Adapter Settings → Update Firmware.
Alternatively, you can enter programming mode by holding the button on the back of the adapter whilst plugging into the powered on console (see the backup steps below for more information).
- Click the Upload button in the software and wait for the process to complete.
The process should take about 20 seconds to complete. Once the firmware has been successfully flashed, the software should say so, and you can then unplug and replug the adapter from the console to restart it.
Backup Steps
If the normal steps will not complete, or the adapter has been bricked and no longer boots, these steps put it into programming mode using the button on the back of the adapter, rather than the Update Firmware menu option.
- Download the flashing software and extract the files to a new directory.
- Download the firmware file you want to flash your adapter with.
- Open the software, and make a note of the available COM ports; it may be the case that none are yet available.
- Switch OFF your console, and connect your adapter to the console; it should be powered off.
- Connect your adapter to your computer via the USB-C / micro-USB port.
- With a thin object, hold down the button on the back of your adapter, whilst powering on the console.
- You can now release the button. If done correctly, the adapter should be in programming mode. Nothing will be displayed on the adapter even if done correctly.
- With your adapter connected, a new COM port should appear in the software for your adapter; select it.
- Select the firmware file you downloaded in the software.
- Click the Upload button in the software and wait for the process to complete.
- If the process fails to complete, try repeating from step 4 onwards.
V1.x.x firmware used the legacy update process via the EM Firmware Flasher tool. This involved first manually putting the device into "update mode", and then download and flashing the firmware manually. Whilst it worked OK, it wasn't ideal.
Newer V2.x.x firmware uses the new update process via EMSpy V2. This is much more reliable, convenient, and faster than the old process. EMSpy will tell you there's a firmware update available, and you can optionally install it with one click.
However, this new process relies on a custom bootloader being installed on your device. If you have a V1.x.x device, this custom bootloader must first be installed, before the newer V2.x.x firmware can be flashed via EMSpy.
Don't worry - this is quick and easy to do, and it only needs to be done once.
You simply have to flash firmware V1.10.0 onto your device using the legacy EM Firmware Flasher tool. This works exactly like any other V1.x.x update, so follow the V1.x.x Firmware steps under Update Firmware above, selecting the V1.10.0 migration firmware as the firmware file.
Once this is done, you should see a Migration Complete message.
From this point on, the V2.x.x update process should work for you. Connecting to EMSpy should prompt you to update to the latest V2.x.x firmware with a single click.
For the full steps and downloads, see here on the Downloads page.